[Previous] [Main] [Next]

Working with Video Media Files


Using the Right-click menu for video media files in the Catalog List

From converting media files to direct access to Timecode files, these are the tools provided on the right-click menu of a video media file:

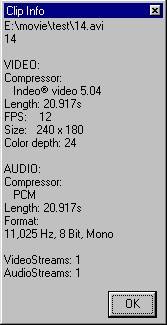
Show Clip Info

Quick access to the parameters of your video media file is available through this command. In general it will tell you the media file's name, location, compression data, duration, number of streams, etc.

   ch2_4_2.jpg


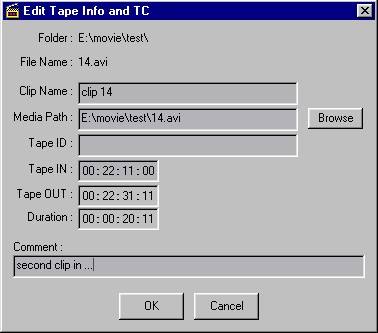
Edit Clip Info and TC
Launching the Edit Clip Info and TC window, you can verify/modify tape and timecode information or enter comments for the TCI file. If the currently selected file does not have a TCI file, Incite Media Assistant will create one if you press the OK button to close the window. The Edit Clip Info and TC window is especially useful for creating timecode for those media files captured or created without such information (for example when you are working with material captured from VHS).

   
ch2_4_3.jpg

Open Clip In New Log Window
When working on a storyboard sequence you may wish to place several of your media files into logging monitors simultaneously. This command will launch a logging monitor window for the selected clip.

Set Current Frame for Thumbnail
This command allows you to use the currently selected frame (as displayed in the picon monitor) for the thumbnail image of the media file. By default, the thumbnail image is the first frame of the media file.

Convert Selected Commands
These three commands will begin converting the select media file into the desired format: AVI, QuickTime (QT) or RealMedia (RM). You can select more than one file at a time (pressing the Ctrl key while selecting or using the Select All command) and then launch a batch conversion from a single file using this command. Conversion begins immediately (the Converter window does not need to be open) using the current settings found under the Video and Audio tabs of the AVI/QT Converter windows or the Setup tab of the RM Converter. If you want to change these settings or open a specific template, make sure you do so before running the specific Convert Selected command. For complete details and procedure on the conversion of media files, see Ch.3 Converting File Formats below.

Color Correction
Running this command will open the Color Correction window. Using this window you can alter parameters for hue, saturation and lightness, as well as for brightness and contrast. The result of the modification is shown in the Preview monitor of the Color Correction window. Once you are happy with the adjustment, you can convert the media file using the new parameters or apply the parameters to a group of selected files for batch conversion. For more see 3.11 Color Correction & Conversion.


Tips & Notes


·IMPORTANT: Incite Media Assistant is not designed for the viewing of RealMedia or QuickTime media files. As a result, these types of files will not be displayed in the Catalog List (even if they are present in the media file folder). Incite Media Assistant can, however, convert to both formats. To convert into QuickTime you will need QuickTime 4.0 installed on your system (QuickTime 3.0 is not sufficient). To convert into RealMedia you will need RealProducer (and RealPlayer for viewing). For more see 3.10 The RealMedia (RM) Converter.  


·TCI files, edited or created using the Edit Clip and TC window, can be imported into an Incite project by selecting the Import/Media Information command in the Collection window. For more see 6.4 Importing TCI Files and Media into Incite.  

[Previous] [Main] [Next]