There are two principle views you can use when working with your storyboard: Storyboard View and List View.
Storyboard View
Storyboard View shows the timeline as a sequence of storyclips placed on a timeline. The storyclips can be edited using traditional editing tools: trim, cut, move, split, etc. To activate Storyboard View press the Storyboard button found on the Storyboard window's main toolbar.
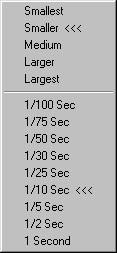
When working with Storyboard view, you can choose the display size of the Storyclips using the Clip Size menu. The first group of options you will find on this menu allows you to change the physical size of the storyclips. The second group of options lets you expand or reduce the number of timeline divisions that are shown. The basic unit for the timeline is 1/100 of a second.
Another way to expand or reduce the timeline is to use the Zoom In and Zoom Out buttons.
List View
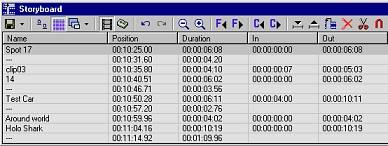
The second viewing method is List View. Essentially, this viewing mode displays all of the storyclips as a list of text information divided into columns. The column headings include: Name, Position, Duration, In and Out. Gaps in the timeline are also indicated. They can be recognized by the "----" used in the Name column. They will have a Duration and Position parameter only. Column order can be changed by clicking on a heading and dragging it to a new position. The vertical order of the clips cannot, however, be resorted. Vertical order depends solely on storyclip placement in the timeline (i.e. the first storyclip on the timeline will be the first clip at the top of the list).
Tips & Notes
·
List View gives you a good indication of what an exported text file will look like, although more information is contained in the CSV or TXT file.